Posts

Showing posts with the label Scenery

Logs

Image
Another quick post. Good chum Colin gifted these lovely resin pieces to me (thanks mate!). These were beautifully cast and very straightforward to paint using a range of Americana browns. I haven’t based them as I want to be able to use them in a variety of scenic settings. They’re from Paul’s Modelling Workshop and definitely recommended. Thanks for looking!

Charlie Foxtrot Pantile Gates

Image
Quick post! A large, ongoing scenery project requires an extra couple of pantile gates, by Charlie Foxtrot Models , so here they are. Made a nice change from all the recent sci-fi stuff. Painted as per all my other Mediterranean scenery. The gates are primed in black and painted using a range of Americana paints: Bittersweet Chocolate, Dark Chocolate, Milk Chocolate, Honey Brown and Bleached Sand. Thanks for looking.

Urban Themed Sci-fi Terrain

Image
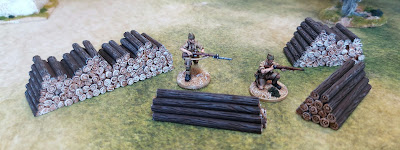
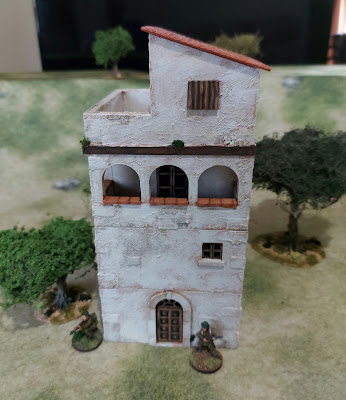
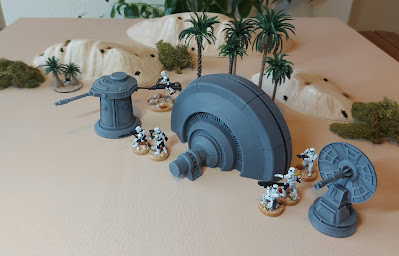
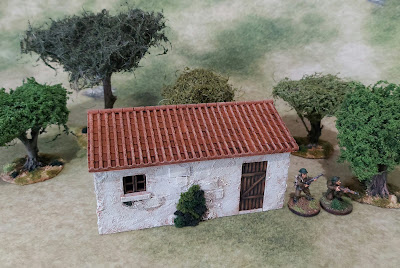
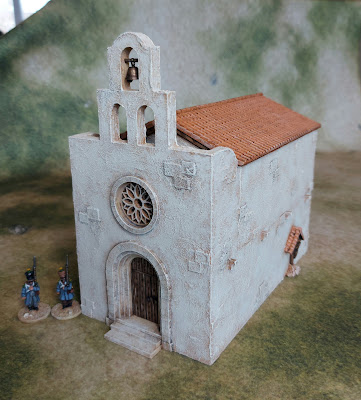
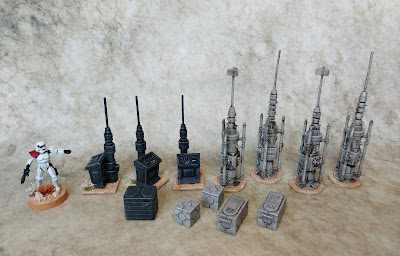
Most of my sci-fi terrain is sand themed so I decided to do something a bit different, hence the urban / concrete theme of these pieces. The building is from Blotz (highly recommended!), from their Middle Eastern range, with one of their space doors. The dish laser is from GF9. The crates etc are a mix of Legion Priority Supplies and TTcombat resin. The building was given a rough coat of masonry paint before painting. Recipe is Dark Grey (B&Q Lousville emulsion, similar to VMC German Grey), then successively lighter highlights of VMC Neutral Grey, Foundry Slate light, Foundry Austrian White light and pure white. NB: for figure bases, the recipe will be VMC Grey Green, Neutral Grey, White Grey. Here's a couple more Blotz buildings I have on the go. To add interest I've used some of the more interesting shapes left over from the MDF "sprue".

Another Charlie Foxtrot Pantile Building

Image
Good chum Colin very kindly gifted me a prototype kit of one of his more recent pantile releases. Being a prototype there was no resin roof section so I made a simple extra storey from foam core and Wills pantile plasticard for the roof.  The door to the balcony is just balsa scribed with a pen to give a wooden planking effect. Some closed shutters give the impression of windows without the faff of cutting holes and fitting window frames, etc. Buildings like this add some extra height to the battlefield and provide ideal look out points. Thanks mate 🙂

Laser Turrets and Power Generator

Image
I ordered these ages ago as they’re rarely in stock for long. Anyway they arrived the other day, much to my delight. All from the GF9 Battlefield in a Box range. Here’s a couple of closer pics. They really are ready to go on the battlefield straight from the box, although I may add a little more weathering etc. I intend to leave them un-based so that they’ll look fine on any type of battlefield from the lush woodlands of the forest moon of Endor, or the ice fields of Hoth to the arid deserts of Tatooine.

More WW2 Scatter

Image
A petrol pump and a few barrels of fuel are the start of a Mediterranean themed rural ‘gas station’. Need to add a dilapidated shed and some piles of junk, rusty car, etc. Spare gravestones (Debris of War, Ainsty Castings) and an unused medieval figure make ideal scatter to enhance graveyards or perhaps as roadside shrines or statues. A pair of brick columns (Debris of War again) and a spare ornate gate (Warbases) make for a handy entrance in a walled garden.

Converted Charlie Foxtrot Pantile Stable

Image
The Charlie Foxtrot pantile kits are very versatile, so here I’ve done a very simple adaptation of the stable converted to make a larger store house or perhaps a small dwelling. As you can see, I’ve blocked off one of the stable doors and replaced the other two-part door with a single piece door from my spares box. A while back I asked Colin to cut some extra doors, shutters and window frames, etc as I knew they’d prove useful. The side door remains as is, but on the back I’ve added a pair of closed shutters. Painting is the same as for all of my pantile models, please see the “How to” tab above.

A Little Bit of Gardening

Image
A very quick post to show a garden I’ve built from scraps of MDF and plasticard in between working on a larger project. It’s approx 4” x 2.5” so ideal for a miniature backyard. This sort of thing is super easy to make given the huge range of tufts, flowers and foliage available these days and I feel they add a bit of extra character to a battlefield. Plus they can represent broken ground or, if taller plants are used, could be soft cover. Anyway, thanks for looking!

Charlie Foxtrot Pantile Church

Image
I’ve been intending to add one of these splendid kits to my collection for some time. Good mate Colin and I were watching the Sharpe series after a busy weekend of gaming when he said he fancied making a kit based on the chapel in the little town of Torrecastro where Sharpe and his men raise the gonfalon of Santiago. He began furiously sketching out plans and designs whilst I supplied tea and biscuits and, if I recall correctly, got on with some ironing! Anyway, here it is. My earlier efforts with a CFM church painted for a friend can can be found here , including the painting recipe. Only slight changes were giving the entire church a coat of textured masonry paint (for better texture) and swapping Foundry Boneyard light for Americana Bleached Sand. For extra interest I’ve added a little “shrine” using a small piece of resin from Hovels. I may add some clump foliage to represent a creeper growing up the stonework. One feature of the kit that Colin was keen to include was being able to...

Buildings for North Africa

Image
The only significant items missing from my North African scenery collection were some buildings so when I saw the Middle Eastern range produced by Simon at Blotz (very nice chap), I knew they’d be ideal. They’re good value and neatly designed too. I’ve bought and built three so far but will definitely add a few more, particularly the buildings with enclosed yards. Here, some DAK troops are clearing the village. This building has been built exactly as per the kit instructions. This building has an added dome roof (not part of the kit). I made this from a polystyrene ball from which I sliced a “spherical cap”. Glue it to the roof and use some wet polyfilla to blend it in and hide the polystyrene texture. The largest of the three kits, again with added dome. The flat roofs lift out to allow models to be placed inside and for this kit the upper storey lifts off too. Highly recommended! Before painting I used a little all purpose filler to smooth over any joins. Painting was very easy: two ...

Mediterranean Garden

Image
Walled garden for my Mediterranean collection made using some spare Charlie Foxtrot movement tray bases and some Hovels resin walls. The only “work in progress” picture I took was this, which shows the basing recipe. I’ve found that giving the areas intended for flock/grass a coat of mid brown first seems to give a richer grass colour plus also provides a contrast from the lighter areas that get grass. The capping tiles were painted in Americana Terracotta, then washed with Agrax, followed by highlights of the base then the base plus VMC Dark Sand. I’ve also used some small offcuts of mdf and plastic to represent brick scatter as I wanted to enhance the tumble-down look of the walls. The walls include some modelled-on bushes which I initially painted a range of greens but I couldn’t get it quite right, so covered them in some of the Luke APS scatter mix. The walls are great value  http://www.hovelsltd.co.uk/accessories25mm.htm  see 2A, 3A and 4A.

Culverts

Image
The very useful 1940 handbook for Chain of Command includes a scenario called “Going with a Bang” where the objective is to destroy a pair of culverts in order to delay the advance of the enemy. As published, it is usually played so as to stall the advance of the German blitzkrieg, but there’s no reason why such a scenario shouldn’t apply to other theatres. With this in mind, we intend to apply this to games set in Sicily/Italy where perhaps the Axis forces need to slow the advance of the Allies. So, I’ve knocked up a couple of very simple culverts using some Javis rough stone walling mounted on pieces of MDF. I’ve attempted to give the ground either side of the structure a damp, almost boggy look, using plenty of scenic tufts and clump foliage, with a few patches of open water. The murky water areas are Foundry French Blue shade followed by a wash of Agrax. The rest is my usual Honey/Tan Yellow/Dark Sand/Boneyard basing scheme. The flocked areas are first painted GW Mournfang Brown.

Grand Manner Pantile Bread Oven

Image
Grand Manner produce some very characterful resin scenery. I especially like this bread oven. Painted for friend, this piece has been completed as per all of my other pantile scenery. Handy for WW2 Italy, Crete, etc, plus Peninsular Napoleonics. Thanks for looking!

Vines, vines, vines!

Image
Continuing to be inspired by Pat Smith’s excellent book about Mediterranean wargames terrain, I resolved to expand my vineyard collection with another batch of vines. Here they are safely stored in a 20 litre RUB. As before each section starts with a wood and wire armature. On to which I glue pieces of Woodland Scenics clump foliage I have enough sections now to comfortably cover an area approximately 3’ by 2’, so effectively a quarter of a conventional Sharp Practice or Chain of Command table. Here are some in a recent WW2 game. Happy gaming! 😎

Refurbishing Trees with Geek Gaming Scenics

Image
I really like the Last Valley trees and think them ideal for games set around the Mediterranean. However a few of mine were starting to look a bit tatty after too much wear and tear. I’ve no idea what the original flock was, so a simple fix was a heavy brush over of watery PVA and a sprinkle of Luke APS fine blend flock. This flock is ace, see  https://www.geekgamingscenics.com/  Highly recommended!  Thanks for looking.

Craters

Image
Good chum Colin kindly gifted me these pieces for my recent birthday. They’re from Paul’s Modelling Workshop and highly recommended. Originally they were going to be painted in the more arid desert style suitable for our WW2 North African games but I decided to paint them for use in our Crete, Sicily and Italian games instead. Recipe is Americana Honey Brown, followed by highlights of VMC Tan Yellow, VMC Dark Sand and Foundry Boneyard light. Here’s a closer pic. Thanks for looking

Legion Priority Supplies

Image
Here are the moisture vaporators, computer terminals and crates from the Priority Supplies boxed set The vaporators and crates were primed in grey then given a heavy dry brush of VMC Stone Grey followed by a wash of GW Agrax. When completely dry, highlight with VMC Stone Grey then pick out the edges using any light, pale grey such as Foundry Austrian White shade. A few dabs of GW Typhus Corrosion completes the weather worn look. The terminals and the larger crate were even easier! Black spray followed by the Foundry Charcoal palette. The buttons are simply dots of very light grey followed by red, green, yellow, etc. In games these items can be used as objective markers (there are several mission cards that require such features) or just as suitably atmospheric scenery.

Making the most of your palms

Image
I’ve had a collection of plastic palm trees for my North African tables for some time now and they looked fine, but after seeing some excellent jungle terrain pieces recently, I decided to try to pimp my palms a little. Here’s the first batch! I began by pulling the palm fronds off the trunks and temporarily sticking them on cocktail sticks (or kebab sticks for the larger trees). Prime them with a dark or mid green spray. I used AP Army Green, I think. Then I gave them a very heavy dry-brush of CdA Army Green, followed by a lighter dry-brush of a VMC green (833 whatever that is). I also dry-brushed a few of the lower fronds with a light brown. I primed the trunks with either a light brown or mid brown spray (AP Skeleton Bone and Leather Brown). The smoother ‘banded’ trunks were painted in a range of light browns whilst the more gnarly trunks were painted darker brown and washed with GW Agrax to bring out the texture, followed by a quick highlight of a light brown. This is a WIP pic of ...